You’ve designed your part, gone through the hurdles of getting your injection mold manufactured, and finally have parts in hand—only to find weak parts covered in sink marks, warping, and suffering from non-fill. What went wrong? Was it a processing misstep? Was it a design blunder?
You may look to wall thickness variations, uneven cooling, and high-pressure sections in the mold as the culprits. Variations in wall thickness drive both sink and warp. When molten plastic fills areas of thick wall surrounded by thinner walls, the thinner sections will cool more quickly than the thicker walls.
This has two impacts:
1) Pack and hold pressure may not reach the thicker section if the thinner sections freeze off too early. The thick section is not appropriately packed out, resulting in indentations and marks known as sink.
2) The thinner sections will shrink away from the mold sooner than the thicker sections, also known as differential shrinkage. This can result in both sink and warp.
Non-fill occurs in regions of high pressure. Plastic fills in regions of low pressure first. Because thick-walled sections are low-pressure regions, they fill first when the plastic melt front is at a higher temperature. Thinner-walled sections fill later, when the plastic melt front is at a lower temperature, causing these regions to be at higher risk of non-fill.
Adding ribs in the part design can help you avoid these defects. Sometimes removing ribs can solve these problems as well.
Why Should I Add Ribs?
Ribs play the most valuable supporting role in many plastics applications. They generally serve two primary purposes in a plastic part – to add strength and function. They can also prevent aesthetic defects and non-fill risks.
Strength — Long, flat stretches of material in plastic parts can pose strength and structure issues. These areas tend to be weaker because they are unsupported. To add strength, changing your material to one that has higher strength properties may bring you closer to a solution. In the case that material change is not possible or does not alleviate the issue, rib structures can add localized strength to your part.
Function — Ribs can also add functionality to your part. Consider using ribs to create functional features in your part instead of more complex child features. This can simplify your design and mitigate molding risk.
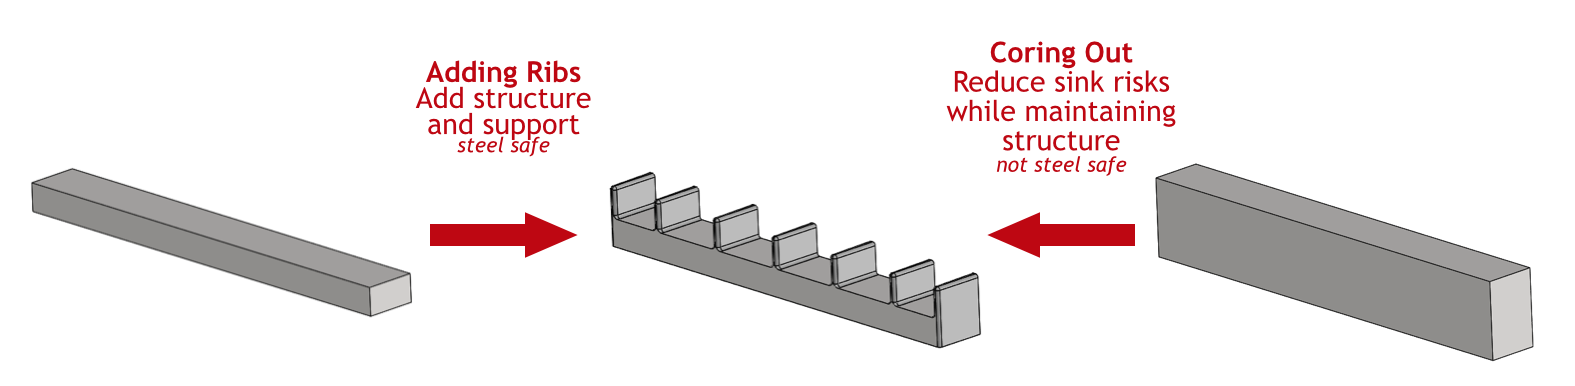
Warp — Long, flat stretches of material also pose higher risk for warping. To offset this, you might want to add material to these stretches to add structure. However, adding material creates risk for increased cycle time and sink. By adding ribs instead, you can add structure and strength while mitigating sink risks.
Sink — In sections that have thicker walls for strength, coring out and leaving structural ribs can have the same effect – maintaining structure and strength while mitigating sink risks.
Non-fill — In thin sections or high-pressure areas, ribs can act as flow leaders, relieving pressure and allowing plastic to flow.
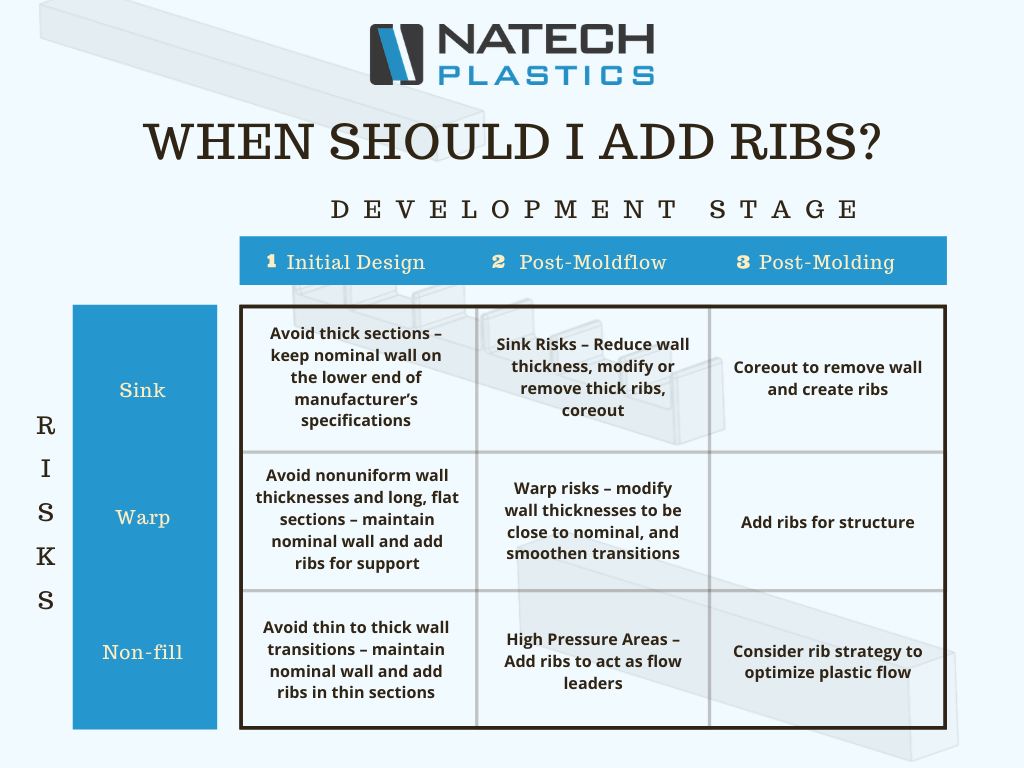
When Should I Add Ribs?
Adding and adjusting ribs to a part design can generally happen at three stages: during initial part design, after Moldflow simulation of the part, and after molding parts.
Initial Design — At the initial design phase, you want to consider areas of flatness and user stress for rib placement. Following standard rib design guidelines can help you design optimal ribs. You can visit this link to learn more about common rib design guidelines.
Post Moldflow — After initial design, Moldflow simulation can help you visualize how molten plastic will flow through and fill the mold to form the plastic part. From here, you can see the risk areas of plastic fill. In thick areas expected to have nonuniform shrink, coring out can reduce the risk of sink. Sometimes ribs create locally thick areas that are susceptible to shrink. Removing unnecessary ribs can help eliminate these shrink risks. In thin or high-pressure areas projected to experience non-fill, adding ribs can reduce these risks.
Post Molding — Once you have molded parts in hand, part problems will inform where addition and subtraction of ribs may benefit part quality. If you see warp, adding ribs can help. If you see sink under ribs, modifying or removing ribs can help. Adding ribs are steel-safe changes, meaning that an existing mold can easily be modified to incorporate them. Removing ribs grows more complicated and costly because metal needs to be added to the tool. Incorporate fewer ribs into your initial design if you are at all unsure.
Where Should I Add Ribs?
If ribs do not serve a functional purpose, their placement may seem arbitrary. You should place ribs where the part needs strength or function. Place ribs along thin sections and long, flat sections to add structure and strength.
Place ribs a minimum of two to three times the nominal wall thickness apart from each other. Adding excessive ribs can prolong cycle time, increase ejection risks, and increase material use. Placing ribs closer together can create cooling issues, which can increase cycle times and sink risk. Close ribs can also create thin steel conditions and ejection issues, as well.
With ribs, you can cleverly improve the strength and function of your part. If you miss opportunities to add ribs in your initial design, Moldflow simulation can quickly highlight areas of concern where ribbing may prove useful. In the worst case, after parts have been made, part defects can show you where ribbing can help. Adding plastic material at this stage is easier than removing it, but nothing is easier than intelligent design from the start.
For assistance with your rib strategy, call to speak to your plastic engineer at (631) 580-3506.